Sunday 29 April 2012

A Near Run Thing


Action at Plancenoit, 18th June 1815
This scenario came from Chris Leach's Fields of Glory (Figure 1 and Photo 1). To win, the Prussians had to exit as many of their 'divisions' as possible from the western, French, side of the table.
Figure 1: Map of the battlefield from Fields of Glory

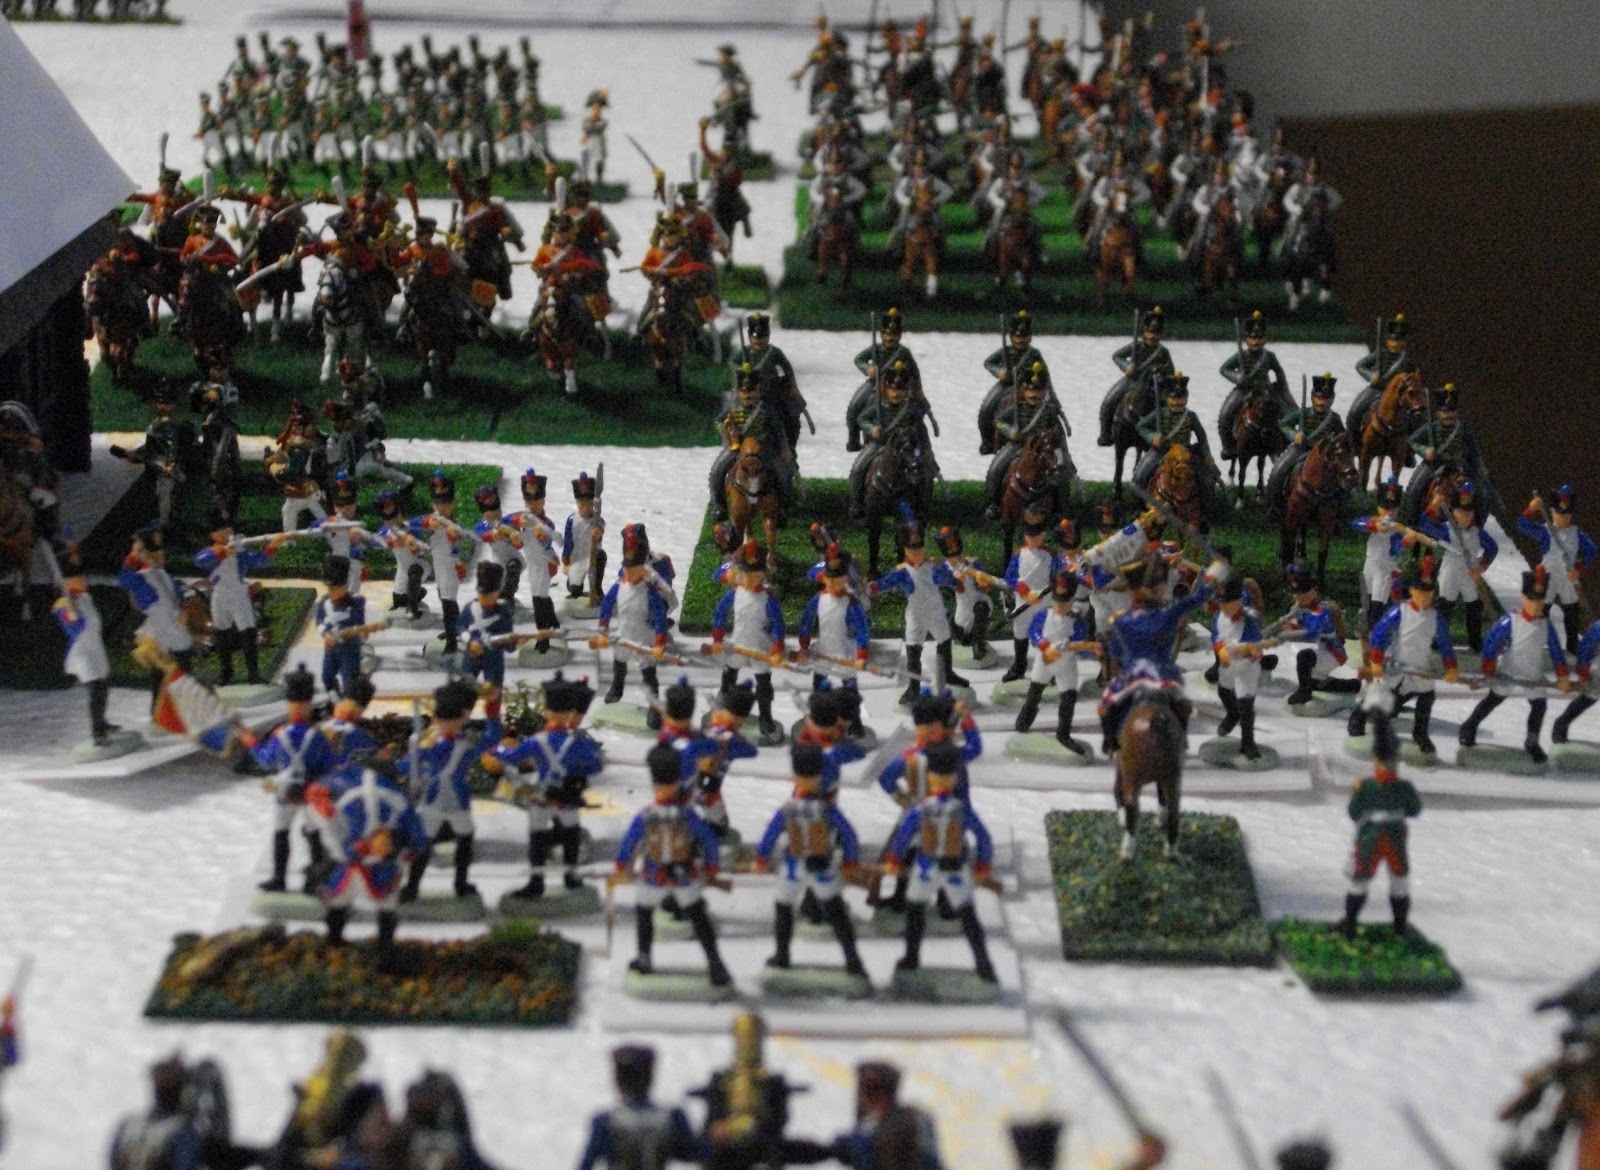
Photo 1: The initial set-up viewed from the French side. The key village of Plancenoit is in the top right of the photo, with Simmer's Division on the hill at the bottom.
The scenario began at 16:30 with the Prussians moving first. Von Hiller's and von Losthin's brigades came on in the direction of Plancenoit and the wood north of Plancenoit respectively. Prince william's cavalry moved down the northern side of the battlefield towards Subervie's waiting French cavalry.
The French then had their first turn and oh, what a turn it was. On the French left flank, Subervie's cavalry did an about turn, presenting their rear to the approaching cavalry of Prince William (Photo 2). Lobau’s "cunning" plan had been to leave Simmer's 19th Division on the high ground north-west of Plancenoit to defend his left while Subervie's cavalry redeployed to his right flank so as to join the approaching Young Guard in an attack around the Prussian left. He had expected the cavalry to undertake a wheel to effect this manoeuvre, but they were instead compelled to about turn. The Prussian commanders could not believe their luck; "we’ll clean up these French in no time after a stupid manoeuvre like that one" (Photo 3).
Photo 2: Facing the wrong way; Subervie's light cavalry about face to follow their orders to redeploy to the French right flank.
Photo 3: A smug Prussian commander enjoying French stupidity.
Lobau still hoped that Subervie's cavalry would be able to escape this disastrous start and outrun their pursuers, but it was not to be. They were caught, still facing rear, and dispersed (Photo 4). This left Simmer's infantry to defend the French left, as planned, but without the benefit of the cavalry support to the French right flank. He formed his left-hand units into square to face off Prince William's cavalry and redeployed his other troops to await the expected assault by von Losthin's men (Photo 5).
Photo 4: Subervie is a lonely figure after his troops had been broken or driven from the field.

Photo 5: Simmer's Division redeployed to protect the French left flank.
The attack on Plancenoit was lead by von Hiller's 16th Brigade, two-thirds of which were landwehr (Photo 6). Bülow sent these troops to assault the town from the south-east. Plancenoit was defended by Jeanin with the 20th Division which, while only two-thirds of the size of Hiller's force, consisted entirely of regulars who were defending a strong position. These factors were to prove telling.
Photo 6: von Hiller's 16th Brigade move to their south-west to approach Plancenoit from the south-east.
While these developments were occurring on either flank, in the centre, von Losthin's 15th Brigade was slowly making its way through the woods north of Plancenoit, headed in the direction of Simmer's 19th Division.
Both sides were soon bolstered by the arrival of reinforcements. Duhesme’s division of six Young Guard infantry battalions entered the battlefield to the west of Plancenoit (Photo 7), while von Hake and von Ryssel arrived to support the Prussians. Seeing the way in which von Losthin was being delayed by the wood, Bülow sent the von Hake around to the south to drive between the woods and Plancenoit. Von Ryssel was ordered to attack the town from the north-east (Photo 8).
Photo 7: The French receive quality reinforcements in the form of Duhesme’s Young Guard.

Photo 8: For the Prussians von Ryssel's newly arrived brigade attacked towards Plancenoit from the north-east.
The Prussian attacks on Plancenoit did not go as planned. The combination, already mentioned, of generally better quality French troops, combined with the strength of their defensive position in the village allowed Jeanin's men to easily see off the first attacks from von Hiller's men. Then, when joined by Duhesme's Young Guard, they aggressively counter-attacked driving into von Hiller's shocked troops (Photos 9–11). Prussian high command were beginning to feel decidedly uncomfortable (Photo 12).


Photo 9–11: French counter-attack by Duhesme's and Jeanin's troops drives into von Hiller's Prussians.
Photo 12: Worries for Prussian high command.
Meanwhile, on the northern side of the battlefield, von Losthin's Prussians had emerged from the wood and immediately assaulted Simmer's position (Photo 13). They too found the attack heavy going, losing casualties in the approach. They were not aided by the poor accuracy of their accompanying artillery batteries.
Photo 13: von Losthin's 15th Brigade emerged from the wood and immediately attacked Simmer’s position on the hill.
Despite these initial set-backs, von Losthin began to wear down Simmer’s men. The situation started to become perilous for Simmer with the arrival of support from von Hake (Photo 14). Then, a strange thing happened. Urged by Blücher to drive forward to support Wellington’s left flank and thus to pressure the right-rear of the main French army—in the form of a re-reading of the scenario victory conditions—Bülow ordered his entire army to drive with all speed to the western edge of the battlefield.
Photo 14: 19th Division under pressure from von Losthin’s brigade to the front, with von Hake approaching the right flank.
This gave rise to the strange situation of the Prussians marching past the French positions, with Jeanin’s infantry and Duhesme’s Young Guard infantry in hot pursuit (Photos 15 and 16). The Prussians pushed on, like automatons, the jeers and volleys from the French infantry ringing in their ears. Simmer’s men were not entirely saved by this somewhat bizarre turn of events, ending the battle surrounded and facing imminent destruction (Photo 17).

Photos 15 and 16: The Prussians drive for the western table edge pressured by Jeanin’s and Duhesme’s men.
Photo 17: Simmer’s last stand
For the Prussians the move from trying to win the battle to trying to win the scenario had been made too late. With Plancenoit firmly in French hands and only one Prussian ‘division’, Prince William’s cavalry, entirely exited off the French side of the table, the battle was a clear French victory. It is always good when a plan comes together and the French were most pleased with the result; particularly after such a terrible start. French bragging rights were increased by the fact that the Old Guard had not been required. It had been a near run thing, but a damned nice thing... for the French!

Saturday 28 April 2012

Shako II and Shako ANF


Having tried, and largely rejected, several sets of rules over the past two years we have now settled on Shako as our preferred, default set—well, sort of!
We will still read and play-test other sets of rules, although we are being increasingly selective about which ones, particularly when it comes to the play-testing. Our aim in doing this has moved from the endless quest for the 'ultimate' set of Napoleonic rules, to seeing if there are any ideas or aspects that we'd like to incorporate into our preferred set; Shako ANF.
We consider the original Shako rules by Arty Conliffe, first published in 1995, to have been a major leap forward in rules for large-scale Napoleonic wargames. We have often mused about why we like Shako so and I have made a list of ten reasons (see text box). In short, Shako was, and remains, an excellent set of rules that are clearly and precisely written and use an elegant system built principally around a single morale rating for each unit. Shako captures the key elements of a Napoleonic battle viz. limitations of command and control, differing troop quality and troop types, characteristics and training of the troops of different nations, strengths and weaknesses of each combat arm, the importance of historical formations and higher order command structure, while keeping the rules relatively short and eminently playable. With Shako ANF we have taken the original Shako rules and added the ‘best bits’ of Shako II (in our opinion) and some of our own rules and edits.

Ten reasons why we like the Shako rules (JF’s list, not in any order).
  1. They work with large battles, which are the ones that I like to do most, but are also okay for smaller ones (down to roughly division level).
  2. They are not stylised, but are not trying to be a detailed simulation either, i.e. they have the playability-accuracy trade-off about right.
  3. They are logical and have adapted some of the 'best bits' of other systems that I know of AND have done it better than anything else we have seen.
  4. They are well written, easy to navigate and have been able to answer nearly everything that we have asked--and when they have not we have often ended up agreeing with Shako (most of the time!), or edited them, or we have written our own rule.
  5. They are 'elegant'. The concept of the "one number" (MR) to determine everything is simply brilliant.
  6. They use troop quality and national characteristics at about the right level. At first I thought this was too little and was thinking of expanding the quality scale to a 12-point one (see post of 30th June 2011 on this blog), but I have rapidly come to agree with Arty's approach on that too.
  7. The influence of quality and luck also seems about right--AND it works (again a change from my original assessment). They are given equal magnitude overall, but are slightly weighted towards quality for average or better troops.
  8. The influence of officer quality is underdone, which is far better than most rules that try to have too big an influence of this on everything from orders to morale to combat to rallying.
  9. We have been able to play games of 12 historical battles, some of them twice, and have achieved directly historical and/or logical and believable results every time.
  10. The games are fun, enjoyable and challenging. One is not having to "fight" with the rules, but can focus on the game, tactics and banter!

Reviews of Shako II, which was published in 2008, suggested that they were largely an aesthetic re‑print that incorporated a few minor clarifications and additions. Sadly, this reflects the oft-encountered problem of reviews of wargmes rules by people who have merely read them, but not in detail and have not play-tested them. Our detailed reading and play-testing of the rules showed that there were many more changes between Shako II and Shako than most of the reviewers would have had us to believe. These include changes to the order in which divisions are selected for action, changes in the transmission of orders, changes to the formation of hasty squares (plus the addition of a ‘hasty line’), the addition of artillery ‘pull-back’ and fire from rifles, the addition of rules for tied mêlées and changes to the rules for rallying units and testing for divisional morale. In all we found twenty-seven aspects that had been changed, added or re-written (see table below).

Table: Changes made in Shako II compared to Shako
Aspect changed
Relevant section & pages
Heavy batteries basing & MR
1.4 p 2; 2.3 p 9
Addition of sappers & engineers
2.0 p 7; 13.5.6 p 91
Skirmisher stands 1 kill only
2.3 p 9; 6.3 p 15
Sequence of play: addition of artillery evade
change to initiative determination
8.5.1 p 35
3.0 p11
Response of divisions on attack to cavalry threat to flank
7.4.3a p 21 (point 3)
Restrictions on attacker manoeuvre prior to contact
7.4.3a p 22 (point 4)
Requirement of cavalry on defend orders to charge if in contact
7.5.1 p 25
Specification of transition from Attack to Defend and from Defend to Attack
7.6 pp 25–26
Transmission of orders; different numbers of ADCs
7.9.1 pp 28–29
Fate of ADCs
7.9.2 p 29
Formation of infantry that fail to form hasty square, but win mêlée and charged again
8.2 p 32 (bottom of page)
More detail on interpenetrations
8.10 p 40
Hasty line formation
8.11.1 p 41
Changes to terrain effects
8.12 p 42
More detail on flank/rear support
8.14 pp 43–47
Artillery ball shot “pullback” stick
9.4.1 pp 51–52
Musketry fire addition of rifles and point blank volley
p 60; p 64
Units defending towns do not suffer failed volley
p 70
Fall backs, breaks & impact on friends moved through
11.4.1 pp 72–74
Mêlée ties
p 74
Changes to divisional morale with addition demoralised and increased chances of negative result
12.0 pp 81–83
Failure to rally
12.1.1 p 81
Addition of rules for plateaus
p 87
Clarification that cossacks use disordered MR in woods
p 87
More detail and/or clarification regarding terrain (e.g. burning town sector, town sector mêlée, streams and combat, field fortification
13.5 pp 88–94
Special rules such as Austrian division mass, French line inf. as skirmishers, French allies using formation change and move.
15.0 pp 95–98
More optional rules; e.g. ammo and optional divisional command rules
16.0 pp 99–100


Several of these changes were excellent and add greatly to the rules, but a large number of them detracted from the original Shako rules. We particularly liked the changes to the order in which divisions are selected for action, changes in the transmission of orders, the addition of artillery ‘pull-back’, fire from rifles, and the revision of rules for tied mêlées. Conversely Shako II completely stuffed-up changes to the formation of hasty squares, and the addition of a ‘hasty line’ is not something that we have adopted (instead opting to allow squares to move, albeit at a very slow rate). The rules for rallying units and testing for divisional morale were also changed for the worse and the rules for breakthrough were made confusing and contradictory.
We have tried to address this in Shako ANF by using Shako as the starting point and only adding the aspects of Shako II that we consider are an improvement. In addition we have added our own ‘superior’ (in our humble opinion) versions of the rules for hasty square and divisional morale, added detailed rules for Cossacks in mélêe and clarified the rules for cavalry obligation to charge when on defend orders and cavalry breakthrough rules. We have also added rules for ‘minor’ elements of a game, viz. skirmishing cavalry, infantry breakthrough (optional), passage of lines (under review), lying down/crouching (under review), casualties to higher-level commanders and movement of the C-in-C. Interestingly, these minor elements have not come into play in any of our games, which is probably why they were not included in the original Shako, nor Shako II?!
Currently Shako ANF is spread over three locations, the original Shako rules, Shako II and the notes of our rules and edits. Clearly this is not satisfactory, particularly since the three of us can forget what rules we are actually playing! We (I) are slowly typing the rules into a single document so that we’ll have them ready for our great game of Borodino in September.

Wednesday 25 April 2012

Nail Biting, Dramatic and, Eventually, Decisive

Battle of Eylau, 8th February 1807: Full Report

This game was our largest project to date. The army totals were
• 1 008 infantry figures, 324 cavalry figures and 11 model guns and crews for the French, • 936 infantry figures, 396 cavalry figures and 19 model guns and crews for the Russians, plus • 144 infantry figures, 36 cavalry figures and 1 model gun and crew for the Prussians, although not all of these were present on the table at once. It was several months in the planning and we were pleased with the resulting game although, as the French player, I was not so happy with the outcome!
Photo 1: The opposing armies line up for battle on a grey February day.

Photo 2: View from ‘Benningsen’s’ command post.
Figure 1: Map of the tabletop showing the initial dispositions of the French (blue) and Russian (green) armies. The squares are 300 x 300 mm2, ground scale 1 mm equals 2 m.
The battle began at 08:00 (Photos 1 and 2) with interesting manoeuvrings by both sides (Photo 3 and 4). ‘Napoleon’ launched an audacious attack in which three divisions of the reserve cavalry, d’Hautpoul’s cuirassiers and the dragoons of Grouchy and Klein, ten regiments in all, were sent to the left to join the light cavalry in a massive attack on the Russian right flank. This movement was supported by a pinning attack from St Hilaire’s division (IV Corps) against the Russian left and a heavy bombardment of the Russian centre by the guns of the Guard artillery plus those of IV Corps (Soult), with support from VII Corps’ guns (Augereau).

Simultaneously, on the Russian left, Baggovut’s and Barclay de Tolly’s divisions turned to their left with the intention of moving to the south-east to extend the Russian left flank beyond Serpallen. This meant that the left wing grand battery and Ostermann-Tolstoi’s division were the sole Russian troops facing the French attack from St Hilaire.

Photo 3 and 4: Opening manoeuvres: Russian left flank and St Hilaire’s attack.
Photo 5: French light cavalry preparing to drive-off Platov’s Cossacks and open the way for the reserve cavalry.
Photo 6: Lasalle’s 5th Hussars dispatch the Ingermanland Dragoons.
From the beginning the French attack produced mixed results. Lasalle’s 5th Hussars entered a mêlée with some of Markov’s dragoons and won, sending them in flight to the rear (Photo 5 and 6). At first the French were ecstatic, thinking that they had overcome the “mighty” Moscow Dragoons of Golymin fame. Their jubilation was tempered somewhat when it was realised that it was the Ingermanland Dragoons that had been overcome so easily. This became a stark realisation when the 11th Chasseurs, also part of Lasalle’s brigade, were charged in flank by the “mighty” Moscow Dragoons and broken (Photo 7)!
Photo 7: Counter-attack—the “mighty” Moscow Dragoons again!
One hour into the battle and each army's manoeuvrings continued. In anticipation of success on his left (north-west flank), ‘Napoleon’ launched the divisions of Leval and Legrand (IV Corps) to attack the Russian centre.

Best laid plans are often set to go astray and things turned from bad to worse for the French light cavalry. Guyot’s brigade of the 8th Hussars and 16th & 22nd Chasseurs à Cheval crashed into Platov’s Cossacks, expecting an easy victory. Their confidence and pride were shattered as the Cossacks won the mêlée and sent them back to where they had come (Photo 8). The 5th Hussars suffered a similar fate when, rallying after their previous success against the Ingermanland Dragoons, they charged into the left-hand regiments of the Cossacks and were beaten in turn.
Photo 8: Cossacks! The expected easy victory over Platov’s Cossacks was not to be.
Success for the French is this sector of the battlefield came from some unexpected sources. Markov’s Lithuanian Uhlans charged the lead unit of Leval’s division, 1/4e ligne, which formed square and easily beat them off (Photos 9 and 10). The Ingermanland Dragoons added to their earlier disgrace by continuing to retreat and were not seen for the remainder of the battle. Lasalle's appeal to his remaining unit, the 7th Hussars, was successful and they remained despite the loss of the other two regiments of his ‘infernal brigade’.
Photo 9 and 10: Lithuanian Uhlans were beaten off by the square of 1/4e ligne.
The French were faring better in the south-eastern sector of the battlefield. St Hilaire's infantry overran the Russian left wing grand battery which had inflicted few casualties as they approached (Photo 11). It was not all one-way traffic though as the horse artillery of Ostermann-Tolstoi’s 2nd Division repelled an attack by the 1/55e ligne and then the 10e légère, both also from St Hilaire’s division.
Photo 11: Success and failure—St Hilaire’s infantry advance rapidly to assault Russian batteries.
It was now mid-morning. Throughout the three hours of battle thus far the artillery of both sides had bombarded their opponents' centre but, while the Russian gunners struggled with range and accuracy, the French were in pleine forme.

This effective artillery fire continued over the next two hours, breaking some infantry in the Russian centre. Aided by the artillery bombardment Legrand and Leval's divisions attacked the Russian centre-right (Photo 12), making good progress, with the former over-running the Russian central grand battery.
Photo 12: Attack of Legrand’s and Leval’s divisions on Russian centre-right.
On the left, the French light cavalry fought more mêlées against Platov’s Cossacks, a little more successfully this time. Two units of Cossacks were broken, but Durosnel's 7th Chasseurs were also beaten. This last set-back was compounded by other developments. Lasalle's division n'existe plus as the 7th Hussars were broken by artillery fire, while, by contrast, Markov's reserve cavalry remained, demoralised, but still present.

While these combats were occurring, ‘Napoleon’ launched Augereau's corps at the Russian centre-left. He had thus committed all his available troops bar the Imperial Guard and Milhaud’s strong dragoon division. This was a calculated risk. Help was on the way in the form of the lead troops of Davout’s corps, Friant's division, which entered the southern corner of the battlefield. At this stage the French had the upper hand; or so it seemed.
By midday the French light cavalry, which had struggled against the Platov's Cossacks and Markov's reserve cavalry, were finally gaining the ascendency. Additionally, they now had 'serious' support in the form of the three French heavy cavalry divisions that were readying to launch a charge against their weaker opponents (Photo 13).
Photo 13: Dashing through the snow... Murat at the head of the column of reserve cavalry just prior to its entry into combat on the Russian left flank.
The initial attack by d'Hautpoul's 1st Cuirassiers against the Petersburg Dragoons was not successful and they fell back and rallied with small loss. Platov's Cossacks were finally driven off by the last of Guyot’s, Colbert’s and Durosnel’s cavalry (Photo 14) and when Tutchkov’s division retreated due to the cumulative effects of the French bombardment a huge gap opened in the Russian right-centre (Photo 15). This gap looked ominous, but Leval and Legrand's attacks had faltered (Photo 16) so there were no French troops available to take advantage of it. Oh for those heavy cavalry!
Photo 14: Beaten but not broken. Platov’s Cossacks in retreat after putting up a spirited defence that saw them break several units of chasseurs and hussars, embarrassing many a beau sabreur and severely disrupting the attack on the Russian right wing.
Photo 15: Gap in Russian line left by retreat of Tutchkov’s division (centre top of photo), but where were the French troops to exploit it?
Photo 16: Faltering attack: Legrand’s troops in retreat—under the very nose of the Emperor!
All of this changed at 13:00. A snowstorm broke which, driving straight into the faces of the advancing French units, slowed their advance and sent them in all directions. The timing was unfortunate as the remaining troops of Davout's corps had newly arrived on battlefield. As the storm passed it appeared that, while a frustration to the movement of the French troops (Photos 17 to 20), it had not been too devastating, or so it seemed...


Photos 17 to 20: Snowstorm! With the snow blowing directly at them, the French units made some erratic movements on their left flank, centre and right flank (top to bottom).
‘Benningsen’ took the opportunity to launch timely and well-executed counter-attacks, sending four divisions against the thin French line in front of Eylau and on the French right  (Photos 21 to 25). Sacken’s grenadiers charged and broke the 14e and 44e ligne of Desjardin’s division (VII Corps), demoralising it in the process. Further attacks from the Russian legions further exposed the thin French line as first Desjardin’s division (VII Corps), then Heudelet’s (VII Corps), followed by Legrand (IV Corps) all broke or ceased to be effective fighting forces. At the same time the attack by Friant's division was blunted by Baggovut’s 4th Jägers.


Photos 21 to 25: Russian counter-attacks break units of Desjardin’s (Photo 21), Legrand’s (Photos 22 & 23), Leval’s (Photo 24) and St Hilaire's (Photo 25) divisions.
The Russians drove on. Essen III’s division pushed towards Eylau while Sacken, Ostermann-Tolsoi, Baggovut and Barclay de Tolly's divisions attacked Davout's three divisions. The only success for the French came on the left flank where d'Hautpoul's 10th/11th Cuirassiers easily accounted for the Pavlograd Hussars (Photos 26 and 27), thus causing Markov's reserve cavalry division to break.

Photos 26 and 27: d'Hautpoul's 10th/11th Cuirassiers break the Pavlograd Hussars.
At 16:00 it seemed that the French were doomed (Photo 28). Napoleon himself was under threat from Essen III's troops and Davout looked set to be overwhelmed (Photo 29). Added to this L'Estocq's Prussians had arrived behind Klein Sausgarten.
Photo 28: Battlefield at around 16:00.
Photo 29: Crisis in the French centre as Essen III’s troops drive towards Eylau.
The situation worsened for the French over the next two hours of battle. In an attempt to stem the advance of the Russians, Milhaud sent his 5th Dragoons against Sacken’s Tauride Grenadiers, but they were pushed back. Worse still, his 12th and 8th Dragoons lost mêlées against the Leibguard Cuirassiers and Kargopol Dragoons of Ostermann's division and were forced to retreat (Photos 30 and 31).

Photo 30 and 31: Milhaud’s 12th and 8th Dragoons beaten in mêlées against the Leibguard Cuirassiers and Kargopol Dragoons, but not broken.
Around Serpallen, Friant's 33e ligne charged and broke the 4th Jägers, but then they and the 48e ligne failed to form square and were overrun by the Alexandria Hussars from Baggovut’s division (Photo 32). This was too much for Friant's men who ceased to be an effective fighting force, leaving the defence of the French right to Davout's two other, fresh divisions; Morand and Gudin.
Photo 32: 33e & 48e ligne overrun by the Alexandria Hussars.
The only success for the French in this period was provided in dramatic style by the reserve cavalry. In the biggest cavalry mélêe of the battle so far, the lead units of the three heavy cavalry divisions charged and broke three units of Russian cavalry (Finland Dragoons, Mitau Dragoons, Grodno Hussars) from Somov’s division (Photo 33). This was to be the ‘high tide’ of the Russian counter-attack as this French success seemed to be the trigger for another twist to this great struggle (Photo 34).
Photo 33: Classic Napoleonic wargaming: the clash of steel.
Photo 34: The "high-tide" of the Russian counter-attack.
Around Eylau, the Imperial Guard firstly repelled and then counter-attacked against Essen III's men. The 1st Chasseurs à Pied broke three battalions of Russian grenadiers and musketeers (Moscow Grenadiers, Vyborg Musketeers, Schlisselburg Musketeers) over four hours of fighting. North-west of Serpallen, Milhaud's fresh 16th and 9th/21st Dragoons charged and broke Ostermann-Tolstoi’s Leibguard Cuirassiers and Isoum Hussars (Photo 35).
Photo 35: Milhaud’s 16th and 9th/21st Dragoons stand firm having broken Leibguard Cuirassiers and Isoum Hussars.
Further north and the 57e ligne was broken by artillery fire, causing Leval's division to break (Photo 36). This was balanced by Sumov's division which failed divisional morale and retreated. Ney arrived with his corps at the north-west of the battlefield and immediately sent Gardanne's division to attack the Prussian rearguard around Althoff (Photo 37).
Photo 36: Gap on the French left flank caused by the loss of Leval’s division.
Photo 37: “Give me night or give me Ney”. The Duc d’Elchingen arrives with his corps around Althoff and attacks Prussian rearguard under Generalmajor von Prittwitz (top of photo)
The battlefield was engulfed by the long northern twilight. Success continued to favour the French arms by dint of targeted counter-attacks by good quality troops and, of course, a bit of “lady luck”. Milhaud's 16th Dragoons broke the Pskov Dragoons of Barclay de Tolly’s 3rd Brigade of the 4th Division (Photo 38). The Polish Uhlans of the same formation were then broken by fire from Gudin’s divisional artillery (Photo 39).
Photo 38: Milhaud’s 16th Dragoons, supported by the 9th/21st Dragoons prepare to charge the Pskov Dragoons (right of photo).
Photo 39: The “hand of god” removes the Polish Uhlans, victims of French artillery fire. The remainder of Barclay de Tolly’s cavalry are in the foreground, while Milhaud’s dragoons are in readiness at the top of the picture.
The Guard continued its successful defence around Eylau, breaking all of the Russian units that attacked their position or were attacked by them (Photos 40 to 42). As the toll mounted, Essen III's division became demoralised, but was never quite broken. In an attempt to emulate their eponymous foot-slogging cousins, the Chasseurs à Cheval unsuccessfully charged the square of Dokhtorov’s Tenginski Musketeers, but rallied back on the left of Eylau, behind the Grenadiers à Cheval (Photo 43).


Photos 40 to 42: In defense of the Emperor, the 1st Chasseurs à Pied and 1st and 2nd Grenadiers à Pied beat off all attacks and counter-attack Essen III’s troops.
Photos 43: The Chasseurs à Cheval retreat in disgrace having failed to dislodge the square of the Tenginski Musketeers.
At the south-eastern end of the battlefield the fight around Serpallen continued. L’Estoq’s Towarzycs Uhlans broke the square of the 1/21e ligne of Gudin's division, but were in turn broken due to a successful (and lucky) defence by the 2/21e ligne that had failed to form square (Photos 44 and 45)! On their left, Morand’s division (III Corps) defended grimly against the attacks of Sacken’s infantry supported by Count Pahlen III’s cavalry (Photos 46 and 47).

Photos 44 and 45:  Towarzycs Uhlans broke the square of the 1/21e ligne of Gudin's division (above) only to be broken themselves after a successful defence by the 2/21e ligne (below).

Photos 46 and 47:  Above: Morand’s division defend against attacks of Sacken’s infantry supported by Pahlen III’s cavalry. Below: the view from the Russian side (Pahlen III’s cavalry).

These aforementioned troops of III Corps formed a solid line on the French right flank, ably supported by the crucial, successful charges from Milhaud's dragoons. On the Russian right, Somov's division which had been further mauled by the French reserve cavalry, failed morale and broke, leaving the French heavy horsemen free to attack the weakened Russian right flank (Photo 48).
Photo 48: A lone aide rushes across what was the Russian right flank with new orders for the reserve cavalry. The French reserve cavalry are at the far left, with Somov’s retreating division in the centre-rear. 
The final actions of the day had the potential to affect the outcome, but in the end changed little. An attack by the 1st Grenadiers à Pied was stopped by a volley of musket fire from Essen III’s Archangelsk Musketeers; a defence that prevented a test of divisional morale and probably saved the division. Dokhtorov’s Ekaterinoslav Grenadiers were not so fortunate when attacked and broken by a combined attack of the Grenadiers à Cheval and 1st Chasseurs à Pied. Lastly, in the failing light, d'Hautpoul's cuirassiers charged and broke Tutchkov's artillery battery.

So, as twilight transformed to night, the battle ended. Ney's corps had joined the reserve cavalry in establishing French control of the north-west area of the battlefield (Russian right flank), and the situation in the centre and right seemed to have been stabilised by the performance of the Guard, III Corps and Milhaud's dragoons (Photos 49 to 51). This was an illusion and the 'wash-up' told a different story.


Photos 49 to 51: End of battle from (top to bottom) the north-west, centre and south-east.
French losses were eight divisions broken or 'destroyed' (five infantry divisions and three (small) light cavalry divisions) while the Russians had lost only four divisions (Tutchkov's and Somov's 'infantry' divisions, the Cossacks and Markov's cavalry), plus most of their artillery, with another 'infantry' division (Dokhturov) in retreat and under threat from the French cavalry reserve.

Tellingly, the French army had lost 145 points of MR against an army break point of 172, so was only two broken divisions away from its break point—although the divisions remaining on the field were all relatively strong. The battle was therefore a Russian 'smashing victory'. The Emperor was most displeased!
With hindsight the audacious flank attack by three-quarters of the reserve cavalry was never going to succeed. This movement deprived the French of a powerful ‘battering ram’ that would have been so useful when the gap opened in the Russian centre. For his part, ‘Benningsen’ timed his counter-attacks to perfection and conducted them brilliantly. These attacks may have been even more successful, had it not been for the dogged defence by the Guard, III Corps and Milhaud’s dragoons and some important pieces of luck.
As with the real thing, this battle was a preparation for the intense struggle of Borodino. Unlike the real thing we knew it and have planned it as such!